Thursday, March 12, 2020

Shopping in Germany

Shopping is shopping, right? Wrong. If you’re used to shopping in the USA, we have some helpful advice for shopping in Germany and Europe.
caption

GERMAN SHOPPING BASICS
Credit Cards (Kreditkarten) – In German-speaking Europe you can never assume that a store or restaurant will accept credit card payment. Germans prefer plain old cash. There’s usually an ATM (Geldautomat) in larger stores and shopping centers, where you can obtain the cash you need, but it’s wise to carry more cash than you might back home.
Sales Tax/VAT (Mehrwertsteuer)
Unlike in the United States, when you see a price tag or a menu in Germany, Austria or Switzerland, what you see is what you’ll pay. The VAT (value-added tax, sales tax) is included in the price, but you can see the tax amount on your receipt. The sales tax is a national tax, not a state (Bundesland) or Swiss cantonal tax. The standard tax rate is 20% in Austria (10-12% for groceries, books and magazines), 19% in Germany (since Jan. 1, 2007; 7% for groceries, books and magazines, flowers, transportation.), and 7.6% in Switzerland (since 2001).
Specialty Shops (Fachgeschäfte) – In Austria, Germany and Switzerland it is still possible to shop in a specialty store where the sales people have some expertise in their field. Although big-box super stores have arrived in Germany, many shoppers prefer a smaller Fachgeschäft, where they can get good advice. Whether it’s cameras, meat, or books, you may also enjoy being waited on by someone who knows what he or she is talking about.
In Europe and the German-speaking countries, the sales tax goes by various names. In Germany it’s the value-added tax (Mehrwertsteuer, MWST). In Austria it’s a turnover tax, or Umsatzsteuer, but the effect on your pocketbook is the same.
VAT Refunds
Under certain conditions, when making larger purchases, it is possible for non-Europeans (non-EU residents) to get a VAT refund for non-edible items. However, the procedure is complex (there are forms to be filled out) and arrangements must be made at the time of purchase. You have to prove you are taking the purchased items out of the EU within three months of purchase. The minimum amount entitled to a refund varies from country to country.
caption

Shopping Hours
Americans, used to shopping at almost any time of day or night, need to be aware of the Ladenschlußgesetz (store closing law). Notice that it is a store closing law, not a store opening law! Germany, Austria and Switzerland have the most limited business and shopping hours in Europe.
Since 2006 each of Germany’s 16 states has been allowed to pass its own laws concerning store hours, and all but two have done so. But don’t plan on shopping on Sunday or after 8:00 p.m. in most of Germany and the other two major German-speaking countries. (To buy groceries or shop on Sunday, go to the nearest large train station, which often has full-size grocery stores and other shops.) Shopping hours are most liberal in Berlin, but even there they have not yet reached anything close to American conditions or even those in many other EU countries. See Shopping Hours in Germany for more on this topic.
Buying Groceries (Lebensmittel)
The first thing an American notices in a German supermarket is a more limited selection of brands and products. (The selection in Switzerland and Austria can be even more limited.) While an American supermarket may offer 20-30 different breakfast cereals, a German one may only have a dozen or so (including a few you’ve never seen before!). On the other hand, German grocery stores usually offer a wider selection of cheeses, meats, bread varieties and other foods, although many Germans still prefer going to a butcher shop (Metzgerei), a bakery (Bäckerei) or pastry shop (Konditorei) for such things. See Grocery Shopping in Germany for more on this topic.
The second thing you may notice is that the checkout clerks are seated at their cash registers rather than standing. Checkout (die Kasse) in a German grocery store is much like that in the US, with laser scanners, etc. But you may feel rushed as you try to pay and bag all your groceries yourself! (That is not the cashier’s job and baggers are extremely rare.) The next customer in your checkout lane will soon be shoving his or her way into your space. And don’t forget to bring your own shopping bag – or you’ll have to pay for one.
caption
In larger German metropolitan areas there are also Costco-like super stores (Globus Handelshof, Kaufland, Metro, Real, etc. – see links below) that sell groceries and other items at “wholesale” prices. As with Costco, you usually have to be a member in order to shop at such hyper stores, and you’ll probably need a vehicle to haul away all your goodies.
Aldi and Lidl are the main discount grocery store chains in Germany and other parts of Europe. In Austria, Aldi uses the name “Hofer.”
More grocery store differences:
  • Credit cards (Kreditkarten) Very few German grocery stores (or any stores for that matter) accept credit card payment, and then only in tourist areas or at larger stores. Most will accept the EC bank card (which requires a German bank account), but your best bet is plain old cash. There’s usually an ATM (Geldautomat) in the store.
  • Shopping carts: You’ll need a one-euro coin for the shopping cart deposit. (The smaller plastic baskets don’t require any deposit.) Just insert the coin into the slot to unlock the cart. When you return the cart, you get your coin back.
  • Weighing veggies/fruit: Many grocery stores require you to weigh and bag fruits and vegetables on a scale in that department before you go to the checkout stand. Some stores have scales at the registers, but you still usually need to put your items in a plastic bag.
  • Organic/natural foods: Germans are big on “Bio” (BEE-OH, natural/organic), and you will find a good selection of organically grown food in German supermarkets and Bioläden.
  • Vegan/Vegetarian: In recent years it has become easier to find vegan grocery items (and vegan restaurants), but mostly in larger cities. Do an online search for “vegan” (the correct German term!) or “veganisch” (incorrect), or other related terms in German (e.g., vegane Lebensmittel, vegan groceries) to find stores near you. Less than 1 percent of Germans identify as vegan.
  • Bottle return (Leergut) Most of the beverage glass and plastic bottles you get in Germany/Europe have a deposit value that you can get back by returning them to any market (not necessarily the one where you bought them). Most grocery stores have automated machines that scan each bottle and determine the deposit value. You get a ticket (Bon) with the total amount, which you give to the cashier at checkout to get your cash.
  • Real orange juice (direkt gepresst): Most Germans drink the normal bottled orange stuff they call orange juice (Orangensaft) – but really isn’t and tastes like crap. If you want the real thing, you have to make your own or go to the refrigerated section and look for cartons labeled “direkt gepresst” (directly squeezed, sometimes found in a special glass-door fridge). Other juices are also available direkt gepresst as well.
Clothing (Kleidung)
When it comes to shopping for clothing and shoes, Europeans, Americans and the British use very different systems for sizes. Not only is there the difference in metric versus English measurements, but there are different philosophies in some areas, especially in children’s sizes.
For children’s clothing, Europeans go by height rather than age. For instance, a child’s size 116 in Europe is for a child 114-116cm (45-46in) tall. That equals the US/UK “age 6” size, but not all six-year-olds are the same height. When converting children’s sizes, you should keep that difference in mind. See the conversion charts below for more.

Tuesday, March 3, 2020

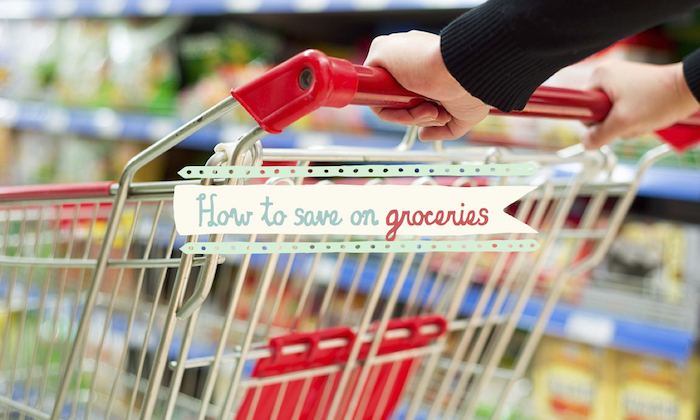
How to Save on Your Groceries in Singapore: Tips from the Smart Spenders


Do astronomical grocery bills give you panic attacks? Singapore’s an expensive place, and groceries in Singapore are no exception. Here are 20 tips from a savvy mama on how to save on groceries!

Grocery shopping in Singapore can be an expensive and anxiety ridden experience. Exhibit A: note the two almost identical pieces of broccoli below that one mama recently photographed at two different local grocery stores. The bottom line is, there are definitely ways to save money on your groceries in Singapore, you just need to put some thought and effort into planning. Here are some tips from the members of Singapore Smart Spenders on Facebook to help you cut your grocery budget and save money.
1. Make a list and stick with it.  Make a weekly meal plan, and write out the ingredients you will need.
2. Avoid high end supermarkets and those that specialise in imported products. Instead, shop at discount supermarkets (such as Giant, ShengSiong and FairPrice) and use online shopping like HonestBee or RedMart. This allows me to carefully select what I want from my computer. It’s difficult to make impulse purchases and I save on taxi fare. Some supermarkets have free delivery at a certain spend level, but even at $7, a delivery it is cheaper than round trip taxi fare. Plus I save time shopping and queuing with online shopping. My recommended shops are Giant Online, Sheng Shiong’s online store allforyouQB Food (for meat and cheeses), Phoon Huat (discounted cheese, baking ingredients), Foodie Market Place (discounted meat and cheese).
value-dollar-shop
3. For toiletries – Try finding the specialty shop near you that has discounted toiletries (usually located in HDB areas or in some malls). Recommended shops: Ocean on New Market Road, ABC shops, Valentine Fragrance at Parkway Parade Mall, ValuDollar.
4. When possible, buy frozen meat. If you notice, most things are previously frozen anyway.
little-india-wet-market
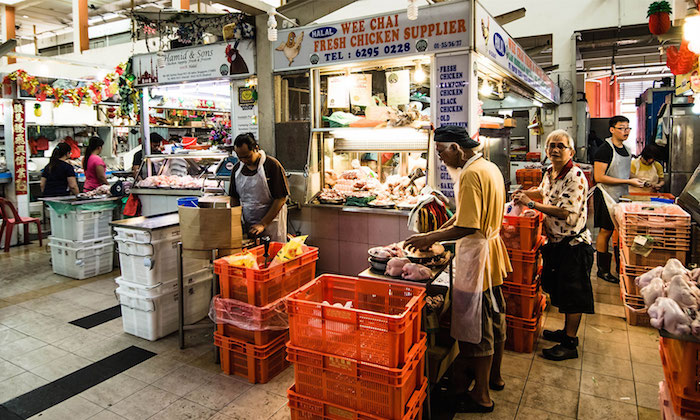
5. Shop at the wet market. Everything is fresher and cheaper than supermarkets.
6. Sign up for ShopbackMilkadeal or the PAssion Card and use the associated supermarket merchants for cash back.
7. Limit purchases of wine and cheese, and if you must buy the cheapest stuff possible. FairPrice has a wine club that has 8% off.
8. Don’t buy produce in the off season. Berries and mangoes can be crazy expensive when not in season, so substitute a fruit that is more affordable. If you’ve never eaten it before, now’s the time to try something new. Have lots of salad and vegetables with each meal but stick to affordable ones (cabbage vs. asparagus, kai lan vs. kale).  Only buy potatoes if you plan to eat them in the next few days or store in the fridge, as they spoil easily.
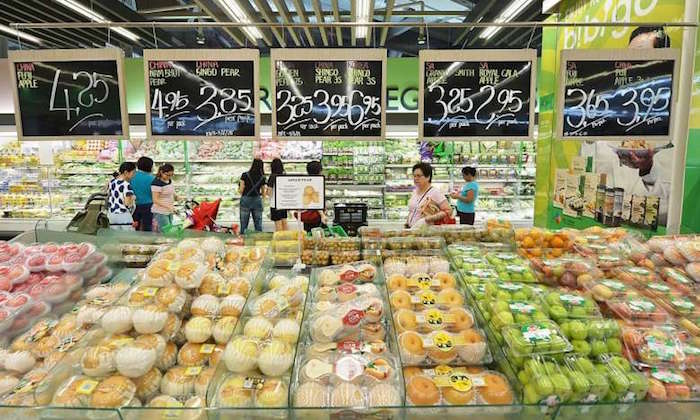
supermarket-sale
9. Stock up when things are on sale. Marketplace is known to put bacon on sale at 50% off so we will buy extra and freeze it. Butter is also freezable.
10. Try the cheapest alternative to your favourite products. Do you really need to buy a $7 bag of Doritos when a $1 Cheeze Balls is just as tasty?
11. Buy fresh food and prepare from scratch. Avoid buying boxed things if possible, but also be critical of your recipes. Things with a bunch of different ingredients get pricey quickly. Try to cook simple meals with protein, vegetable and starches and as few ingredients as possible. You can do a lot with butter, garlic, onion, and ginger. I had to give up a few recipes that, while delicious, cost me more than a restaurant meal to prepare myself. Forget those and use on special occasions.
12. Don’t overbuy — otherwise you will just throw out spoiled food.
dried-fruit-snacks
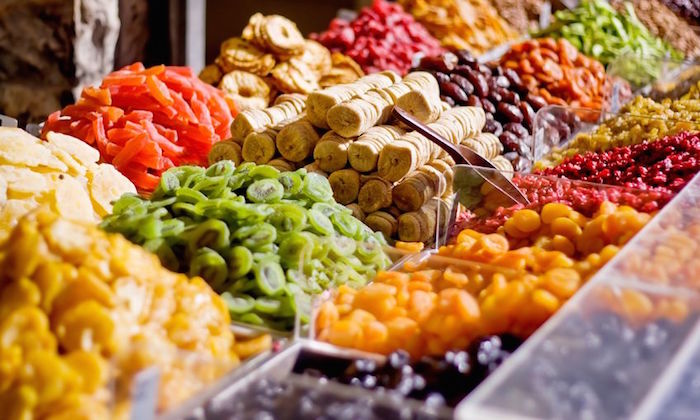
13. I keep dried fruit on hand for snacks. It can be more expensive than fresh but it also has a longer shelf life and is more portable.
14. Learn to save everything to freeze and reuse in other recipes. For example, freeze bananas, then make banana bread, smoothies, or pancakes. Fried rice is a great way to reuse meat and vegetables. Leftover mashed potatoes from one dinner can make tuna patties or masala potatoes another night. Mini muffins and quiches are great for using up leftovers and spring roll wrappers are a much cheaper case instead of pastry. Leftover bread can be turned into bread pudding, bread crumbs, croutons.
15. Cook Asian dishes instead of Western. They are lighter on meat and ingredients are much easier to buy.
Supermarket Receipts
16. Have a budget and stick with it. Figure out how you can swap and substitute and cut back. Be brand un-loyal and be willing to substitute for what is cheaper and on sale.
17. I will stretch a recipe asking for a large amount of meat with less meat but extra vegetables, or even a can of beans.
18. Get a slow cooker. You can buy cheaper cuts of meat like chicken leg quarters and beef chuck and the slow and low temp makes them just as tender as breast meat.
19. Take inventory of what you have on hand.  Use before you have to throw away or things expire.
20. Redefine your meals. A simple sandwich or salad can also be dinner. Mealtime is about recharging and bonding with friends and family, so you don’t have to focus on the food, instead focus on the company.  Or — Don’t shop. Enjoy a large hawker plate of chicken rice with your family. It’s cheaper than cooking at home (we won’t get into the nutrition…).

Sunday, February 16, 2020

Street Food In Australia: 10 Best Delicacies That Are Literally Finger Licking Good!

yummy food

10 Street Food Delicacies You Ought To Try In Australia

While there are innumerable cuisines to try in Australia, here’s a list of 10 food options that you must try on your next trip. Take a look!

1. Barbecued Snags

grilled food
Available at almost all the street vendors across the country, Barbecued Snags define Australian food culture. With a variety of meat rolled into a sausage, dipped generously in garlic butter and then barbecued, it is no wonder that this is one of the most loved snacks here!

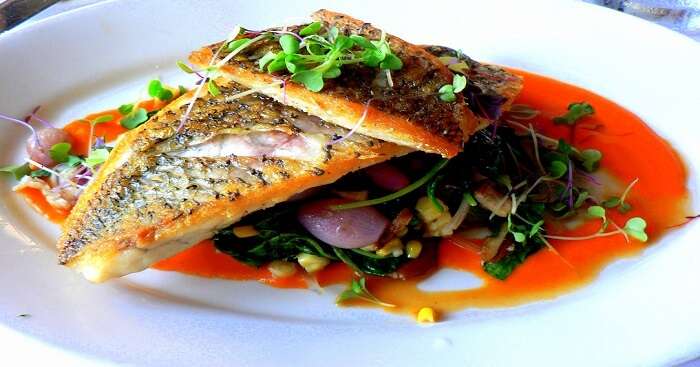
2. Barramundi

Soft buttery meat
Soft buttery meat with crispy skin, a plate of Barramundi is a perfect piece of fried fish. People often take it up a notch by decorating it as fish steak, but Barramundi can best be enjoyed on the streets of Australia.

3. Pigs in a Blanket

delicious meat
For those of you who are wondering, what is the most popular food in Australia, well, Pigs in a Blanket seems like the right answer! A double dose of delicious meat is what this often-called sausage is like. Give up the bread and load more on the meat!

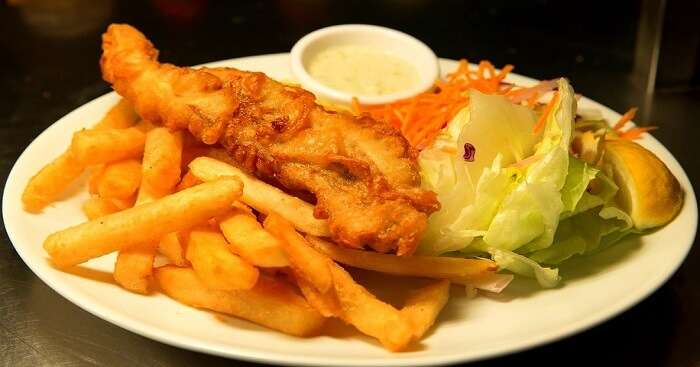
4. Fish and Chips

tasty fish chips
Set out to the beach, and the popular Australian food on the shore is the good old Fish and Chips. With the most delicious fresh fish in its waters, this country has to be the best place to eat seafood. Small vendors along the beach offer delicious fish and chips in small portions, perfect for a snack!

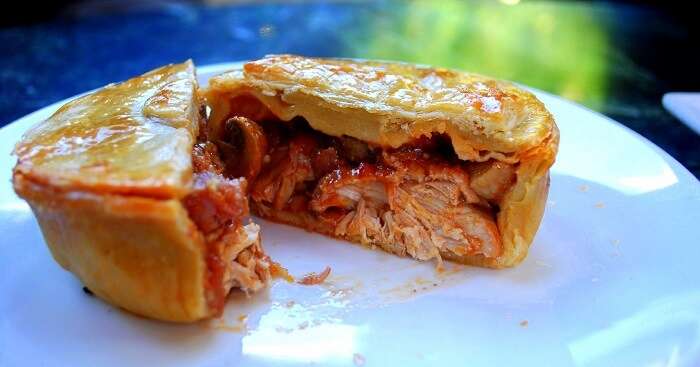
5. Meat Pies

various combinations of meat
Been to Australia and not had the famous Meat Pies? Impossible! Of all the things to eat in Australia, this is one that is permanent on every foodie’s list. This flaky dish is packed with various combinations of meat, available as a snack, or even a fancy meal. Pair it with gravy and mashed potatoes to have a filling meal at one of the gourmet restaurants, or just get a piece at the local vendor!

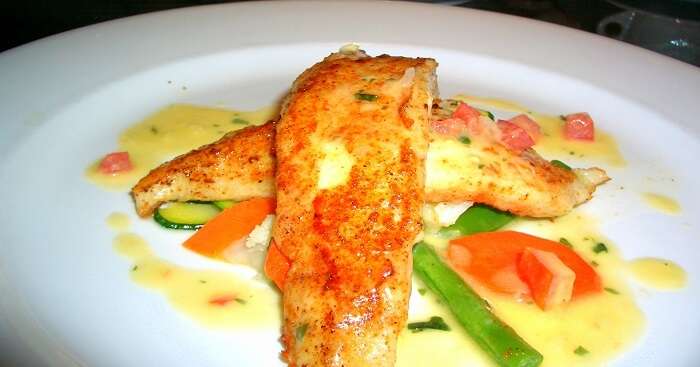
6. John Dory fillets

tasty fish
A happy resident of the Australian waters, John Dory is a type of fish which is also one of the much-loved Australian snacks. Often served with chips, salad, or even mashed potato, this on the go snack is delicious, especially the ones with a dash of herbed oil!
7. Dagwood dog
crisp, and topped with tomato sauce
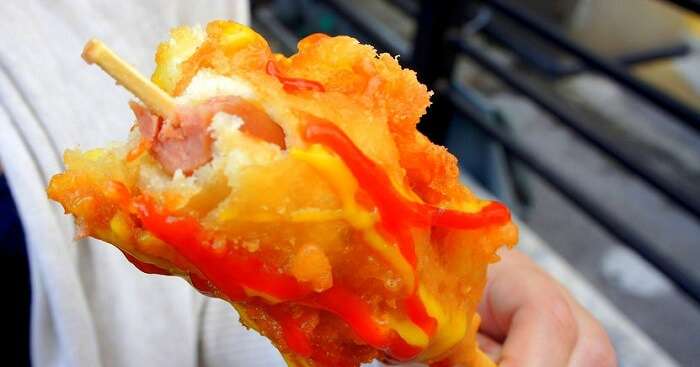
Another food to try in Australia is the Dagwood Dog. Meat on a stick, deep-fried to crisp, and topped with tomato sauce, this delicious treat is permanent on the menu at any food market, carnival, and fair.

8. Chiko roll

spring rolls
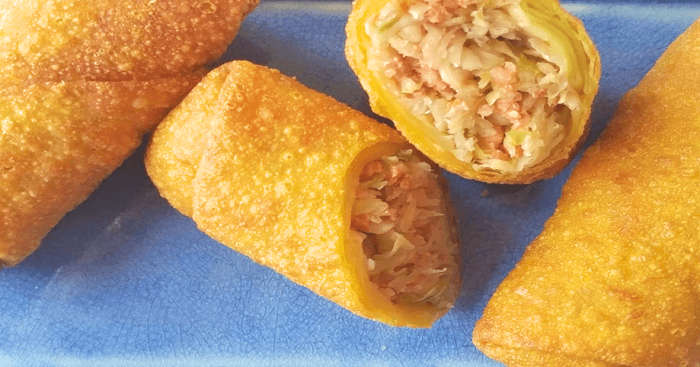
Part of the Australian culture of food, Chiko Rolls are like spring rolls, with a variety of vegetables and beef as the stuffing. This stuffing often varies from shop to shop! Since it is one of the most easily available snacks, they are the easiest option for a hungry belly.

9. Crab sticks

small pieces of fish
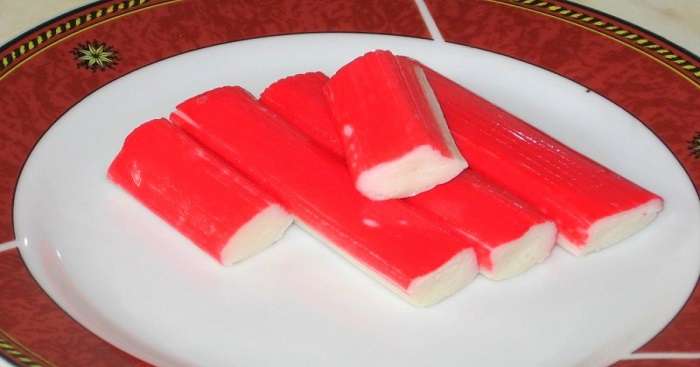
Unlike its name, Crab Sticks are not made out of crabs. In fact, small pieces of fish are dipped in batter and fried in the shape of crab legs! A fun dish to explore especially for kids, you must try it while here.

10. Hamburger with beetroot

crispy beef patty
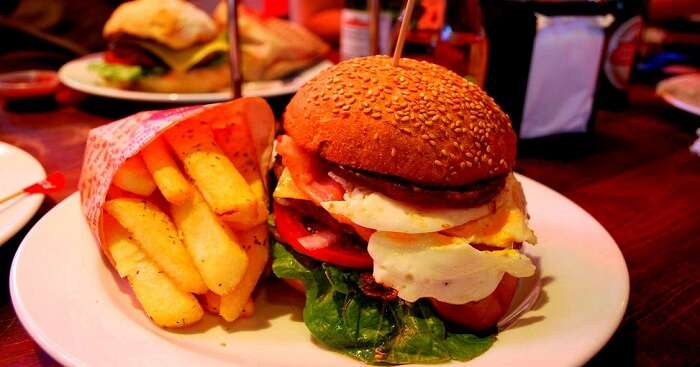
While many outsiders find the addition of a slice of beetroot to a classic hamburger unique, this is what makes the Australian burger special! A crispy beef patty, soft burger buns, veggies, and a slice of beetroot finishing it, it cannot get any better than this!

Tuesday, February 4, 2020

Fruit-herb stuffing for all seasons!


I have several stuffing-related confessions to unload today:
My first stuffing love was found at a friend’s house, when her mother served us an apple stuffing from a Pepperidge Farm mix that is no longer made, I presume because it’s not 1989. My god, did I nag my mother (who wasn’t terribly keen on packaged foods, meanie) to make it too. Sometimes she’d cave, though never often enough, but it didn’t stop me from growing up thinking that the dreamiest stuffing includes tart apples, celery, lightly caramelized onions and herbs, a dream I was repeatedly denied as a child and yes, I’m requesting a very tiny violin.
torn-up bread. cornbread works too.
apples, celery, onion, bread, herbs
I think if you’re limiting your stuffing consumption to a single day in November, you are missing out. When you snip stuffing free of its holiday-specific tethers, it doesn’t take long to realize how welcome it could be speared onto your fork the other 364 days a year, a category it shares with latkes (as awesome at cocktail parties as they are for weekend breakfasts topped with a lacy-edged fried egg, and especially fitting this year), yule logs (for Thanksgiving or just the mega-Yodel of it) and fairy lights, which you should not even pretend aren’t as awesome strung across a yard on a July evening as they are outlining shutters and fire escapes in December. I would eat stuffing every week of the year if everyone would stop looking at me so strangely about it.
apples, celery and onion, sauteed in butter

piled into a pan
I am so insistent that stuffing tastes amazing during the breakfast meal with a loosely cooked egg on top, at lunch, aside a salad, instead of a roll, or dinner on days that are not Thanksgiving, in lieu of a grain or potato, that I went to extensive lengths to develop a recipe called Breakfast Stuffing (but really a Stuffing For All Meals) for The Smitten Kitchen Cookbook, something of an herbed and savory but not really eggy breakfast strata, studded with my favorite stuffing flavors. I tested and tested and tested this. We enjoyed and enjoyed and enjoyed it. But, nobody else could get their head around it. Every person I mentioned it to said, “Yeah? Breakfast Stuffing, huh?” in that oh-that-scribble-was-a-dinosaur? voice. I know the oh-that-scribble-was-a-dinosaur voice. So, I pulled it, and it has lived on my computer since, hoping to one day find a home.
apple and herb stuffing
It’s been four years. Maybe it’s time?
So, here is my favorite stuffing for all days of the year, but especially next Thursday. It includes all of the apples and celery and onion I was denied as a child, sometimes cornbread too, and sometimes, I even put some breakfast sausage in it, but it’s not a requirement. It’s very easy to make — just torn bread, gently toasted, some chopped stuff lightly sauteed in butter, then baked in a pan and stuffed, uh, places* [clutches pearls]. It reheats well. It’s a flexible recipe, in case you detest one ingredient but can’t live without, say, chestnuts. And if you’ve ever wanted to eat stuffing for breakfast on day that are not the day after Thanksgiving, well, you’re among friends.
sometimes we slice and toast it, too
sometimes i put an egg on top
Thanksgiving recipes: My favorites are listed here, but if you think I’ve missed something, head to the search box (top left, under the logo) and type in the ingredient — I bet we have something. Unless you’re looking for a whole turkey recipe… um, next year, I promise. [Thanksgiving Recipes]
More Thanksgiving this week: I realized near the end of last week that I had five Thanksgiving dishes left to share with you, and wouldn’t it be fun to post each day this week about one? So, Monday was Green Bean Casserole with Crispy Onions. Today is stuffing. And if all goes well (so many tiny inconvenient things — meetings and tests and tours and a pesky case of laryngitis — are plotting against us this week), but I’m going to persevere. I love these dishes too much to keep them from you any longer.
Apple and Herb Stuffing* for All Seasons
6 cups torn chunks French, sourdough or country loaf, torn into bits (I use 2 7-ounce demi-baguettes)
5 tablespoons unsalted butter
1 large Spanish or sweet onion, chopped small
1 large or 2 small stalks celery, diced small
1 teaspoon chopped fresh thyme leaves
1/2 teaspoon table salt, plus more to taste
Freshly ground black pepper
1 large or 2 small firm, tart tart apples, such as Granny Smith, peeled, cored and diced small
1/4 cup roughly chopped flat-leaf parsley
3 sage leaves, minced
1/2 to 1 cup cup turkey, chicken or vegetable stock or broth
1 large egg
Position rack in center of oven and preheat to 350°F. Spread bread cubes in single layer on large rimmed baking sheet. Bake until pale golden, stirring occasionally, 10 to 15 minutes. Let cool in pan while you prepare the other ingredients.
Generously butter a 2-quart baking dish (a 9×5-inch loaf, 8- or 9-inch square dish, etc.) with 1 tablespoon butter. Melt remaining 4 tablespoons butter in large skillet over medium heat. Add onion, thyme, salt and lots of freshly ground black pepper and cook for 2 minutes, until becoming translucent. Add celery and cook for 2 more minutes. Add apple and saute until a bit tender, 3 to 4 minutes more.
Place bread in large mixing bowl. Scrape contents of skillet on top. Whisk egg and 1/2 cup broth or stock together and pour over. Stir in parsley and sage. Spoon into prepared pan. If mixture looks a little dry, pour remaining 1/2 cup broth over it. [This is a good place to pause, if needed. Nothing bad comes of the stuffing absorbing the liquids for longer.] Bake for 30 to 40 minutes, until brown on top and no liquid appears if you insert a knife vertically into the center of the stuffing pan and turn it slightly. Serve immediately, or reheat as needed.

Monday, February 3, 2020

Smoke-roasted stuffed bell peppers!


After Day One at the wineries and Days Two and Three at the grill, we spent our last day on a barely too brief to mention swing into San Francisco where we wandered the Ferry Market Building and lunched at the Slanted Door with friends before heading up to Berkeley. We had dinner with a gorgeous group of food bloggers that evening at Oliveto in Oakland, and on recommendation from the lovely Shuna, breakfast at Mama’s Royal the next morning. In between these gullet-gutting excursions, we found some time on Monday to wander about the Berkeley campus where we wallowed in nostalgia for our unscheduled college days and once wrinkle-free foreheads (fine, that was just me) before jetting back to the land of late dinners, humidity, and the daily grind.
But really–let’s cut to the chase already, shall we? After raking through my extensive notes from the weekend’s grilling class, it’s even clearer than before what a Grilling 101 it was, chock full of building blocks. The recipes, though, were anything but introductory and I’ve included one of my favorites at the end.
So, with little further ado, five totally nerdy bits of grilling information I learned this weekend:
1. Do you know why gas grills don’t sear as well as charcoal grills? To get a good sear, you need a raging hot fire and a dry surface. Charcoal burns drier than gas. Gas is about 30 percent moisture, releasing 1/2 to 1 cup water every 10 minutes that the grill is on. This water adds steam to the cooking process.
2. There are five ways only to cook with fire: Right in the fire, right near the fire (like toasting a marshmallow), directly over the fire, indirectly, with no heat directly underneath, and an oven set-up, where the walls are heated. [See Figure 1, brought to you by a one-hour delayed flight.] Indirect was totally new to me because I’m obviously not from the South or Southeast, two regions where they would never call throwing burgers and hot dogs on directly over a blazing grill “barbecue.”
3. But there are six grilling techniques: direct, which is what we are the most used to, and is a lot like broiling; indirect, which is great for denser, bigger foods that take a long time to cook; rotisserie, which is great for even-browning and add smoke, which is a great technique for gas grills, which impart no aroma; barbecuing, usually with a pit smoker and an off-set firebox, whereby food cooks for a long time over a very low, highly-flavored heat; and cooking in the coals, in which you ditch the grill grate and do just what it sounds like.
4. When considering grill fuels, it’s good to know the pros and cons of each. Propane grills are the most popular in the U.S., but they have the aforementioned water content issues. Gas grills are also common, connected directly to the gas line of the house. (My parents, EMTs and my father the volunteer fireman would probably like to add that directly connected gas lines can be serious fire hazards.) Charcoal comes in two forms, briquettes and lump charcoal. Of the former, some are made with cheap scrap wood and all sorts of other fillers, not to mention borax as a binder. Lump charcoal is their preference, it has no additives and it burns much hotter. Wood produces some of the most incredible flavors, tastes that vary from wood to wood, however, fresh wood is 50% water, is harder to light and doesn’t burn easily. Seasoned wood actually burns hotter than lump charcoal.
5. Get this: Higher heat doesn’t make something cook faster. Why? Because conduction, one of the three types of heat transfers that occurs in grilling, isn’t very effective, and little can be done to speed up the process, as food isn’t much of a conductor. Raising the temperature just traps more heat, and makes the edges browner. However, convection, or circulated heat that works even better with a lid, creating an oven-like state, is more effective, as is radiation, which is heat that comes off the fire but never directly touches the food, such as the warmth that emanates from the sun. This is the part of a class that sounded the most like science lab because they started talking about the electromagnetic spectrum, thus I did what I always did then–zoned out and doodled. Look! I drew our teachers as grills!
Finally, and no, I am not just telling you this because my weekend was like, a sponsored promotion of this book, if you have any interest at all in cooking outside, you have got to buy Mastering the Grill. It is absolutely loaded (like, 400 pages stuffed) with mind-blowing amounts of building blocks and helpful tidbits, like those above, but ten thousand more.
Usually, when we read about grilling, it’s about barbecuing, or the culture around Southern and Southeastern grilling. But this is about the technique, science, and approaches to cooking with fire, which means that it is endless useful, whether you put peaches, Foccacia, brisket or corn on the grill. The book isn’t about regional sauces or techniques, but how to wield fire to your cooking advantage.
Also? In case the “Terrance and Phillip” doodles don’t give it away, the authors are pretty cute.
scooped-out pepper halvespepper stuffingfilling the pepperssmoke-roasting the stuffed peppers
One year ago: Chocolate Caramel Cheesecake
Smoke-Roasted Bell Peppers Stuffed With Garden Vegetables
Mastering the Grill by Andrew Schloss and David Joachim
Yes, I know: Where’s the beef? Well, after a weekend of burgers, chicken, sausage, and ribs I’m still in the land of Meat over and even the thought of it makes me groan a little. This, however, is something I can’t wait to make again, a lighter, crunchier and healthier variety of stuffed pepper and pretty as a picture.
Makes 8 small servings
2 medium red bell peppers
3 medium mixed bell peppers (orange, yellow, green)
3/4 teaspoon kosher salt
1/2 teaspoon ground black pepper
3 tablespoons butter
1 onion, finely chopped
2 cloves garlic, minced
1 medium zucchini, cut into 1/4-inch dice
1 medium yellow squash, cut into 1/4-inch dice
2 cups fresh or frozen corn kernels (from 3 to 4 ears of corn; for extra flavor, once you’ve cut the kernels off, use the dull side of your knife blade to scrape the remaining corn and juices, or “milk” from the cob)
1 medium tomato, seeded and cut into 1/4-inch dice
2 tablespoons chopped fresh herbs (such as parsley, oregano, basil or a mix)
1/4 cup plain dried breadcrumbs
Oil for coating grill grate
2 tablespoons grated Parmesan cheese (optional)
If using a gas grill: Use indirect heat on medium (325° to 350°F), a 2- to 4-burner grill-middle burner(s) off, or a 2-burner grill with 1 side off and a clean, oiled grate.
If using a charcoal grill: Indirect heat, medium ash, split charcoal bed (about 2 dozen coals per side) with a clean, oiled grate on medium setting
1. Heat the grill as directed. Soak 2 cups of apple or oak wood chips or chunks in water for one hour.
2. Seed, core and cut one of the red bell peppers into 1/4-inch dice. Cut the remaining bell peppers in half lengthwise right through the stem, leaving a bit of stem attached to each half. Cut out the cores, seeds, and ribs from the interiors of the peppers, leaving the stem intact. Sprinkle the insides of the peppers with 1/4 teaspoon of the salt and 1/4 teaspoon of the pepper.
3. Melt the butter in a large skillet over medium heat. Add the onion and saute until almost tender, about 4 minutes. Add the garlic, chopped bell pepper, zucchini and yellow squash. Saute the vegetables until crisp-tender, about 4 minutes. Stir in the corn and tomato and cook until heated through 1 to 2 minutes. Stir in herbs, breadcrumbs, and the remaining 1/2 teaspoon salt and 1/4 teaspoon pepper. Cook and stir until the breadcrumbs soak up most of the liquid in the pan. Remove from the heat and spoon the filling equally into the pepper cavities.
4. When the grill is hot, put the soaked wood chips or chunks over the coal on both sides of the grill. If using gas, put the wood chips in a smoker box or in a perforated foil packet directly over one of the heated burners.
5. Brush the grill grate and coat it with oil. Put the stuffed peppers over the unheated part of the grill, cover, and cook until just tender 20 to 30 minutes. If your grill has a temperature gauge, it should stay around 350ºF.
6. Remove the peppers to a large serving platter. Sprinkle with the Parmesan (if using) and serve.

Sunday, February 2, 2020

6 Ways to Protect Your Baby During Cold and Flu Season

Image result for how to protect new born baby from cold"Your baby will get a cold at some point. It’s inevitable. Babies’ immune systems are immature, which makes them more susceptible to the more than 200 different viruses that cause the common cold. Plus, your baby—like all babies—loves to touch everything as he explores the world. And pretty much everything he touches winds up in his mouth, which is the best place for icky germs to make their way into his body. 

Don’t worry! You don’t have to give in and just wait for the inevitable to happen. There are steps you can take to help prevent the number of colds your baby will get. And, perhaps most important, there are steps you can take to ensure he never gets the flu.

Follow these six tips for a healthier cold and flu season.

Be on high alert for the first two months. Before your baby has had his first round of immunizations, it’s crucial to have every defense up. The number one thing you can do during this time is to keep the baby away from crowded places like shopping malls and grocery stores.

Keep your baby covered when in public places. 
If you’re past the two-month point and make a trip to the mall, keep your baby in the stroller with a thin blanket over the opening. Chances are your baby will be snoozing anyway (at least we hope so, for your sake!) and this will prevent strangers from being tempted to take a peek or—worse—a touch!

Always carry disinfecting wipes and hand sanitizer. Germs can live up to five hours on things like shopping carts, so make it a habit to wipe things down. If you’re not able to wash your hands, a little hand sanitizer can go a long way.

Enforce a strict “no sick guests allowed” policy. If your mother-in-law is getting over bronchitis and proclaims she won’t touch the baby but just has to see him, stay strong. Sorry, MIL, you need to stay away until you no longer have symptoms. Don’t make exceptions for anyone. If someone has a fever, they need to be fever-free (without using a fever reducer) for at least 24 hours.

Breastfeed if possible. If you’re able to nurse your baby, great! Studies show that babies who are exclusively breastfed for six months are less likely than formula-fed babies to get colds and ear and throat infections. It’s pretty amazing, actually. The antibodies from your body are transported through your breast milk, which gives your little one an extra line of defense. If you are unable to breastfeed, don’t be hard on yourself. There are other things you can do on this list to protect your baby.

Get your shots. Babies can’t get the flu vaccine until they’re six months old, which is why moms and moms-to-be are urged to get vaccines for flu and pertussis (whooping cough). Getting the flu shot when you're pregnant passes antibodies on to your baby that should last him for about six months. The flu can be deadly in newborns, making any side effects you may experience from the vaccination (low-grade fever, nausea) minor in comparison. The Centers for Disease Control and Prevention recommends that expectant moms also get vaccinated against whooping cough between 27 and 36 weeks so they don’t pass the disease to their unvaccinated newborn. It’s also highly recommended that anyone who comes into regular contact with the baby receive these vaccines.

Friday, January 31, 2020

Newborn Baby Care Tips in Summer!


A mother holding her baby while standing in a purple lupine field
  1. Summers are never easy for anyone, especially with the current soaring temperatures across the world. Your baby is no different, and as a new parent, you are bound to be frantic and wondering how you go about keeping baby cool during the summer. Most parents have questions like- What do you feed them or how much do you bathe them? Yes, your grandmother may have some very solid home remedies for rashes, or you may be receiving other advice from various people on how to care for a newborn baby during the summer months. We’re here to help you make your way through this advice and give your little angel the care they require based on professional input.

How Frequently should you Bathe your Newborn in the Summer?

This depends entirely on your baby and their preferences. The only thing to keep in mind here is that the water should not be cold. Neither should it be hot, ensure it is just a little warm or maybe even room temperature for a newborn baby in summer by dipping your elbow into the water. This is ideal for your baby to cool down and a couple of times a day will not make them fall sick.

Can you Use Oil for a Baby Massage?

Baby oil massages are vital for your little one’s skin and will keep their skin hydrated and cool during summer. Ensure it is an oil that suits their skin and it is washed off well. Make a note of the fact that oil can clog pores and won’t have them breathing light if kept on the baby too long. Bay oil massages stimulate the baby’s joints circulation through the body. Your little one will have a smile on their face thanks to this baby skincare in the summer regime. They will take a nice, deep soothing nap that will give mommy and baby a chance to relax in the sweltering heat.

Can you Use Talcum Powder on your Baby’s Skin during Summer?

The vote on this is divided when you ask mothers as a lot of people believe it can be bad for the baby and not have any cooling effects. In reality, a lot of pediatricians state talcum powder can have a cooling effect on your baby and prevent rashes caused by sweat and the friction of your little one’s body against their bedding. As a new mother, you don’t have to ponder the question- how to care for newborn babies in summer. Drop the powder into your hand and gently rub it all over you’re newborn. This is to ensure they don’t breathe the powder and you do not spread excess to clog their pores.

Essential Summer Baby Care Tips

Parents taking their newborn baby for a walk in nature
Relax and take your time adjusting to the heat. Your baby and you will find your rhythm, and you’ll enjoy the summer in peace very soon. Here are a few tips on keeping baby cool in summer.

1. Baby’s Diet

If your baby is still breastfeeding, then ensure to feed them often to keep them hydrated. If they no longer are, then they are no longer under the protection of mommy’s antibodies and need to build up their immunity. Consult your doctor on what to give them. Let them suck on fruit to cool down when it comes to food for one year baby in summer. If they have just started solids, then a couple of feeds accompanied by boiled food is ideal. Keep powdered milk on hand as the regular stuff goes bad quickly in the heat.

2. Hygienic Water

As mentioned above, at 6 months and below your little one’s immunity is low and you need to protect them. All water must be boiled and thoroughly hygienic to prevent any diseases. Keeping baby cool in summer must not compromise their health. If its bottled water, then double-check the seal and keep watch for signs of dehydration.

3. Heat Rashes

Heat rashes are quite common amongst babies in the summer. Experts recommend putting two spoons of sandalwood powder in their bathwater and apply talcum powder in the manner described to keep your little one cool. Switch diapers and loose clothes if they are uncomfortable.
4. Dehydration
Dehydration can sneak up on your baby and your kids without anyone knowing. All their energy can mislead you, and you’ll never know. Monitor your baby’s urine output and for any other signs of dehydration like fever, vomiting, diarrhea, unable to drink water, no wet diaper for more than six hours, excessive drowsiness or fussiness, dry lips and mouth, no tears when crying and dizziness.

5. Away from Mosquitoes Or Bugs

Bugs swarm around your delicate baby just as much as everyone else during the summer, but they need added protection. Use bug spray but ensure it is organic and your little one is not allergic or open to harm in any way. Use air conditioning or air coolers that are regularly cleaned to keep away mosquitos. A temperature of 25°C is ideal.
6. Choosing the Right Clothes
Loose clothes ensure your little one can breathe and their skin is not suffocated. This will avoid heat rashes and have them feeling cool. While it is the norm to cover your baby’s head with a cap in some countries, this is best avoided unless it is very hot and sunny outside. Dry their head with a damp towel if they overheat and not a dry cloth.

7. Protection from Common Illness

Your baby relies on its mother’s immunity while it is being breastfed until 6 months. Once this ends, they are unprotected and left to fend for themselves. You can help them out until their immune system grows strong enough. Ensure their diet supports a healthy protection system and they are well-hydrated. Do not let them sweat too much or leave them damp for too long. Switch in immunity-boosting food supplements recommended by your doctor as well.
8. Protection from Sunburn
A baby’s skin is incredibly delicate and subject to easy burning. When you are going out, ensure to put a little baby-friendly sunscreen on them to keep those harmful rays away. Your little one will thank you for it later. A little cap is also ideal for very hot and sunny days.

9. Room Temperature

A lot of parents are paranoid about the temperature and their baby’s susceptibility to cold and illness. Being careful with your baby goes without saying, but remember they are not as delicate as they seem. A little bit of air-conditioning never hurts anyone and a temperature of 25°C is ideal. If you are using an air cooler, ensure it is clean. A baby’s damp head must not be exposed to the AC and should be dried with a damp cloth or wet wipe.
10. Consult Doctor If Necessary
If your baby is displaying symptoms of dehydration or has a stubborn rash that does not disappear with other methods such as over-the-top treatments, consider consulting a doctor. If they seem to be really struggling with the heat and in a lot of distress, it could be another issue altogether and require medical intervention.
As is the case with every step of your baby’s development, their first summer is going to be difficult but wonderful for you. Make a note of what your little one needs, and they’ll be sure to let you know, don’t you worry! Feed them a variety of organic fruits and vegetables, don’t skimp on the juices and let lose the summer wardrobe. Also, never hesitate to consult a doctor if you feel something is not right with your baby. Your role as a parent has expanded to include a fresh responsibility that can be quite enjoyable!